Wrapped in Red Hat Pattern (free pattern)

DISCLOSURE
This page may contain affiliate links. Working with affiliates helps me cover the costs of running a website and providing free content for all you awesome people. If you make a purchase on my website, it is possible that a small percentage of the sale will go directly to me (at no additional cost to you). All opinions remain my own.
The perfect holiday hat unlike any other
I’m feeling pretty festive this year, which is not normal for me. I’m not big into holidays, but I couldn’t help but be inspired to design a holiday hat for my trip to Alaska.
December 9, 2020
Every year my husband, Garner, likes to blast Christmas music. He has a “Christmas List” on his iPod (yes, he still uses an iPod), but you won’t find any Mariah Carey on that list. He loves the Jackson 5 Christmas Album, classics such as the Margaret Whiting and Johnny Mercer version of “Baby it’s Cold Outside.” He even plays the “A Christmas Together” album from The Muppets and John Denver (yes, my husband is an adult and he still listens to The Muppets music!), and he has plenty of tracks from years of KROQ’s Almost Acoustic Christmas CDs - remember those?!
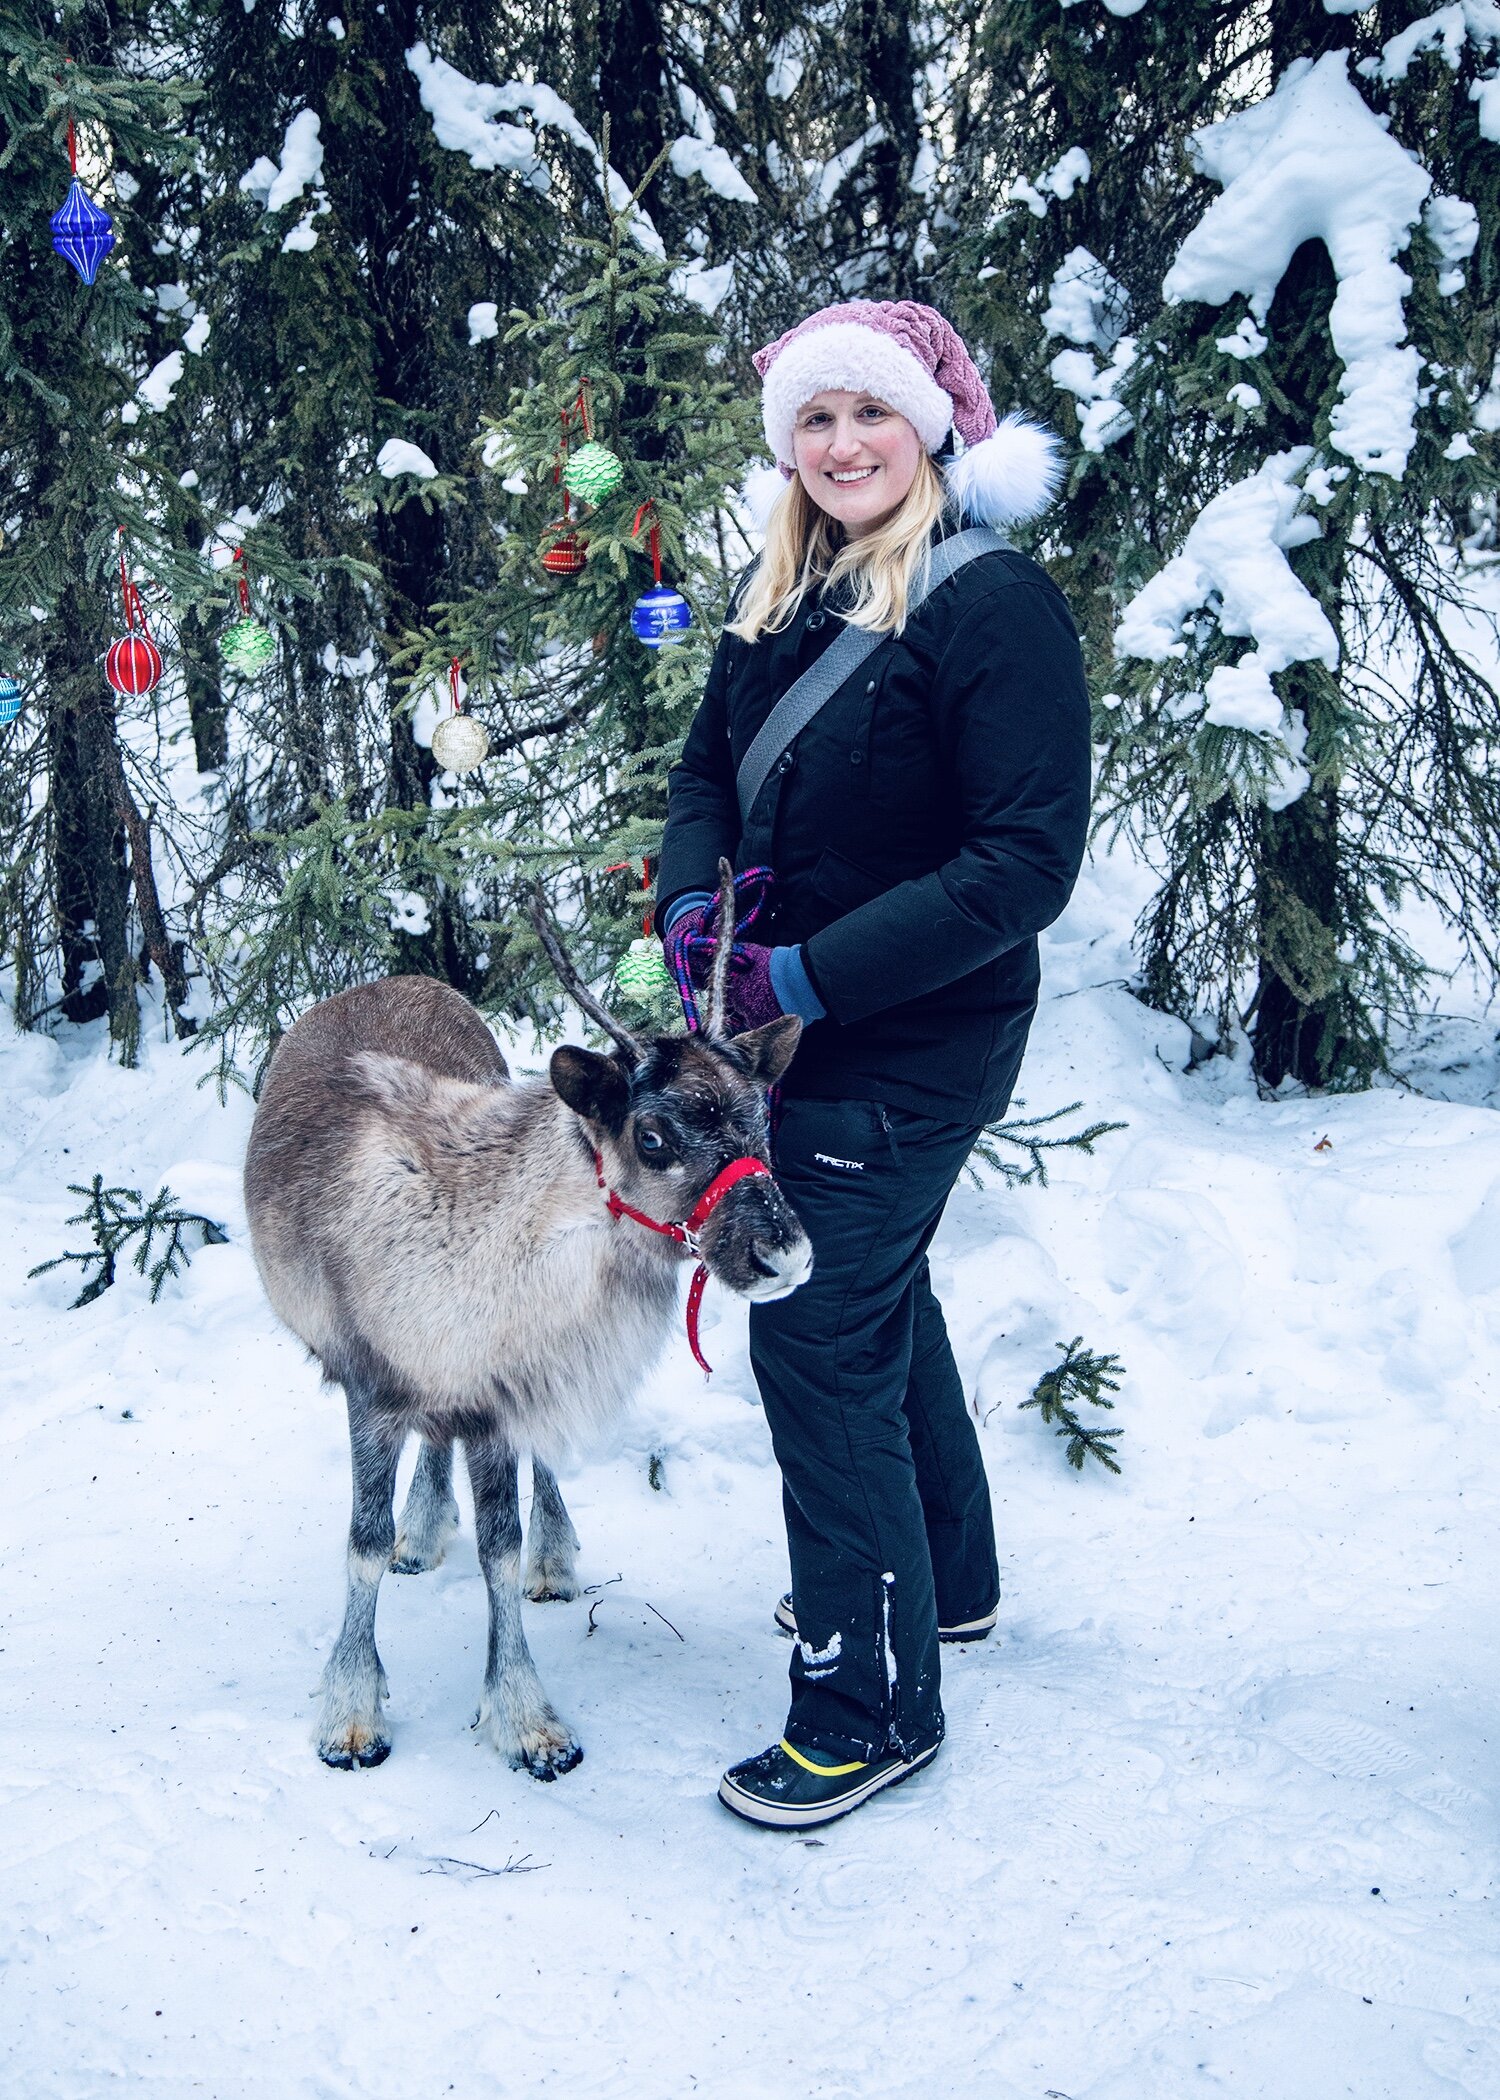
This is Jasmine and she is adorable! Photo credit: David McKay
Garner calls me Scrooge most years when I complain about the holiday music he tortures me into listening to. But he does keep the holiday soundtrack to being played only from the day after Thanksgiving until after Christmas Day (sometimes he pushes it to New Years!). It’s not that I don’t like some of the music, it’s just that I get tired of being bombarded with it in EVERY STORE I go into during the holiday season. Okay, yeah, I guess I’m a Scrooge!
But there is something different about this year. I spent the first part of December in beautiful Alaska for a photography tour. There is a bit of a merry feeling when you are around snow and hanging out with reindeer. I guess this year, I have sorta gotten into the holiday spirit!
I designed this hat to be fun and festive, but with a bit of a twist. I had to keep the classic fur brim and snow white poms, but I chose a yarn with a bit of glitz in it and broke the traditional noggin topper into a set a pigtails. It’s as much fun to wear as it is to knit!
When it came time to name this piece, I decided to name it Wrapped in Red after the Kelly Clarkson Christmas album. There are a few newer Christmas records that I do enjoy (but always in moderation!) and this one is actually on my playlist this time of the year.
You don’t have to love the holidays to enjoy this hat. Whip one up for your Christmas card or Zoom holiday party (because holiday parties probably aren’t happening this year) and be sure and tag @knitsyknits and #explorewithknitsy to show off your creation; I’d love to see how you got into the festive spirit this season!

WRAPPED IN RED Hat Pattern
‘Tis the season to break out those red and green sparkly pieces from the back of your closet and pick out your outfit for the holiday festivities. I am a pigtailed hat that is sure to be different than any your co-workers are donning to their office parties. Whip me up in some joyful, warm, and fuzzy yarn and be the most stylish one in your office!
MATERIALS

Yarn
Yarn Bee “Fur the Moment” (C1)
62 yards/57 meters; Bulky
100% Polyester
1 skein
Colorway One: Cream
Colorway Two: Soft Pink
Yarn Bee “Velvety Smooth Sparkle” (C2)
161 yards/147 meters; Worsted
94% Polyester, 6% Metallic Polyester
1 skein
Colorway One: Red
Colorway Two: Blush
Needles
US 7/4.5 mm 16” circular needle
US 7/4.5 mm 40” circular needle 40” circular needle for magic loop
Notions
Cable Needle
(2) 4.5 inch/11.5 cm Pom Poms in white Scrap Yarn (optional)
Stitch Marker
Scissors
Tapestry Needle
Gauge
15 sts and 21 rows = 4 in/10 cm in stockinette stitch
Finished Measurements
To fit head circumference: 22 in/56 cm
Measures 10 in/25.4 cm wide and 15 in/38 cm tall when laying flat
Notes
This piece is knit completely in the round. You begin on your shorter needle and then switch to a 40” circular needle to work the pigtails in magic loop. You can use DPNs if you so desire!
Abbreviations
*. . .* - repeat between asterisks
bor – beginning of rnd
C6L – place next 3 sts on cn and hold to front, K3, K3 sts off cn
C6R – place next 3 sts on cn and hold to back, K3, K3 sts off cn
cn – cable needle
K2tog – knit two together (1 dec)
m1PL – make one purl left – using your left needle, pick up bar between last st worked and next st to be worked from front to back, purl into the back of the bar (creating a purl left slanting twist) (1 inc)
m1PR – make one purl right – using your left needle, pick up bar between last st worked and next st to be worked from back to front, purl into the front of the bar (creating a purl right slanting twist) (1 inc)
M1L – using left needle, pick up bar between
last st worked and next st to be worked from
front to back, knit into the back of the bar
(creating a left slanting twist) (1 inc)
P2tog – purl two together (1 dec)
rnd/rnds – round/rounds
sm – stitch marker
st/sts – stitch/stitches

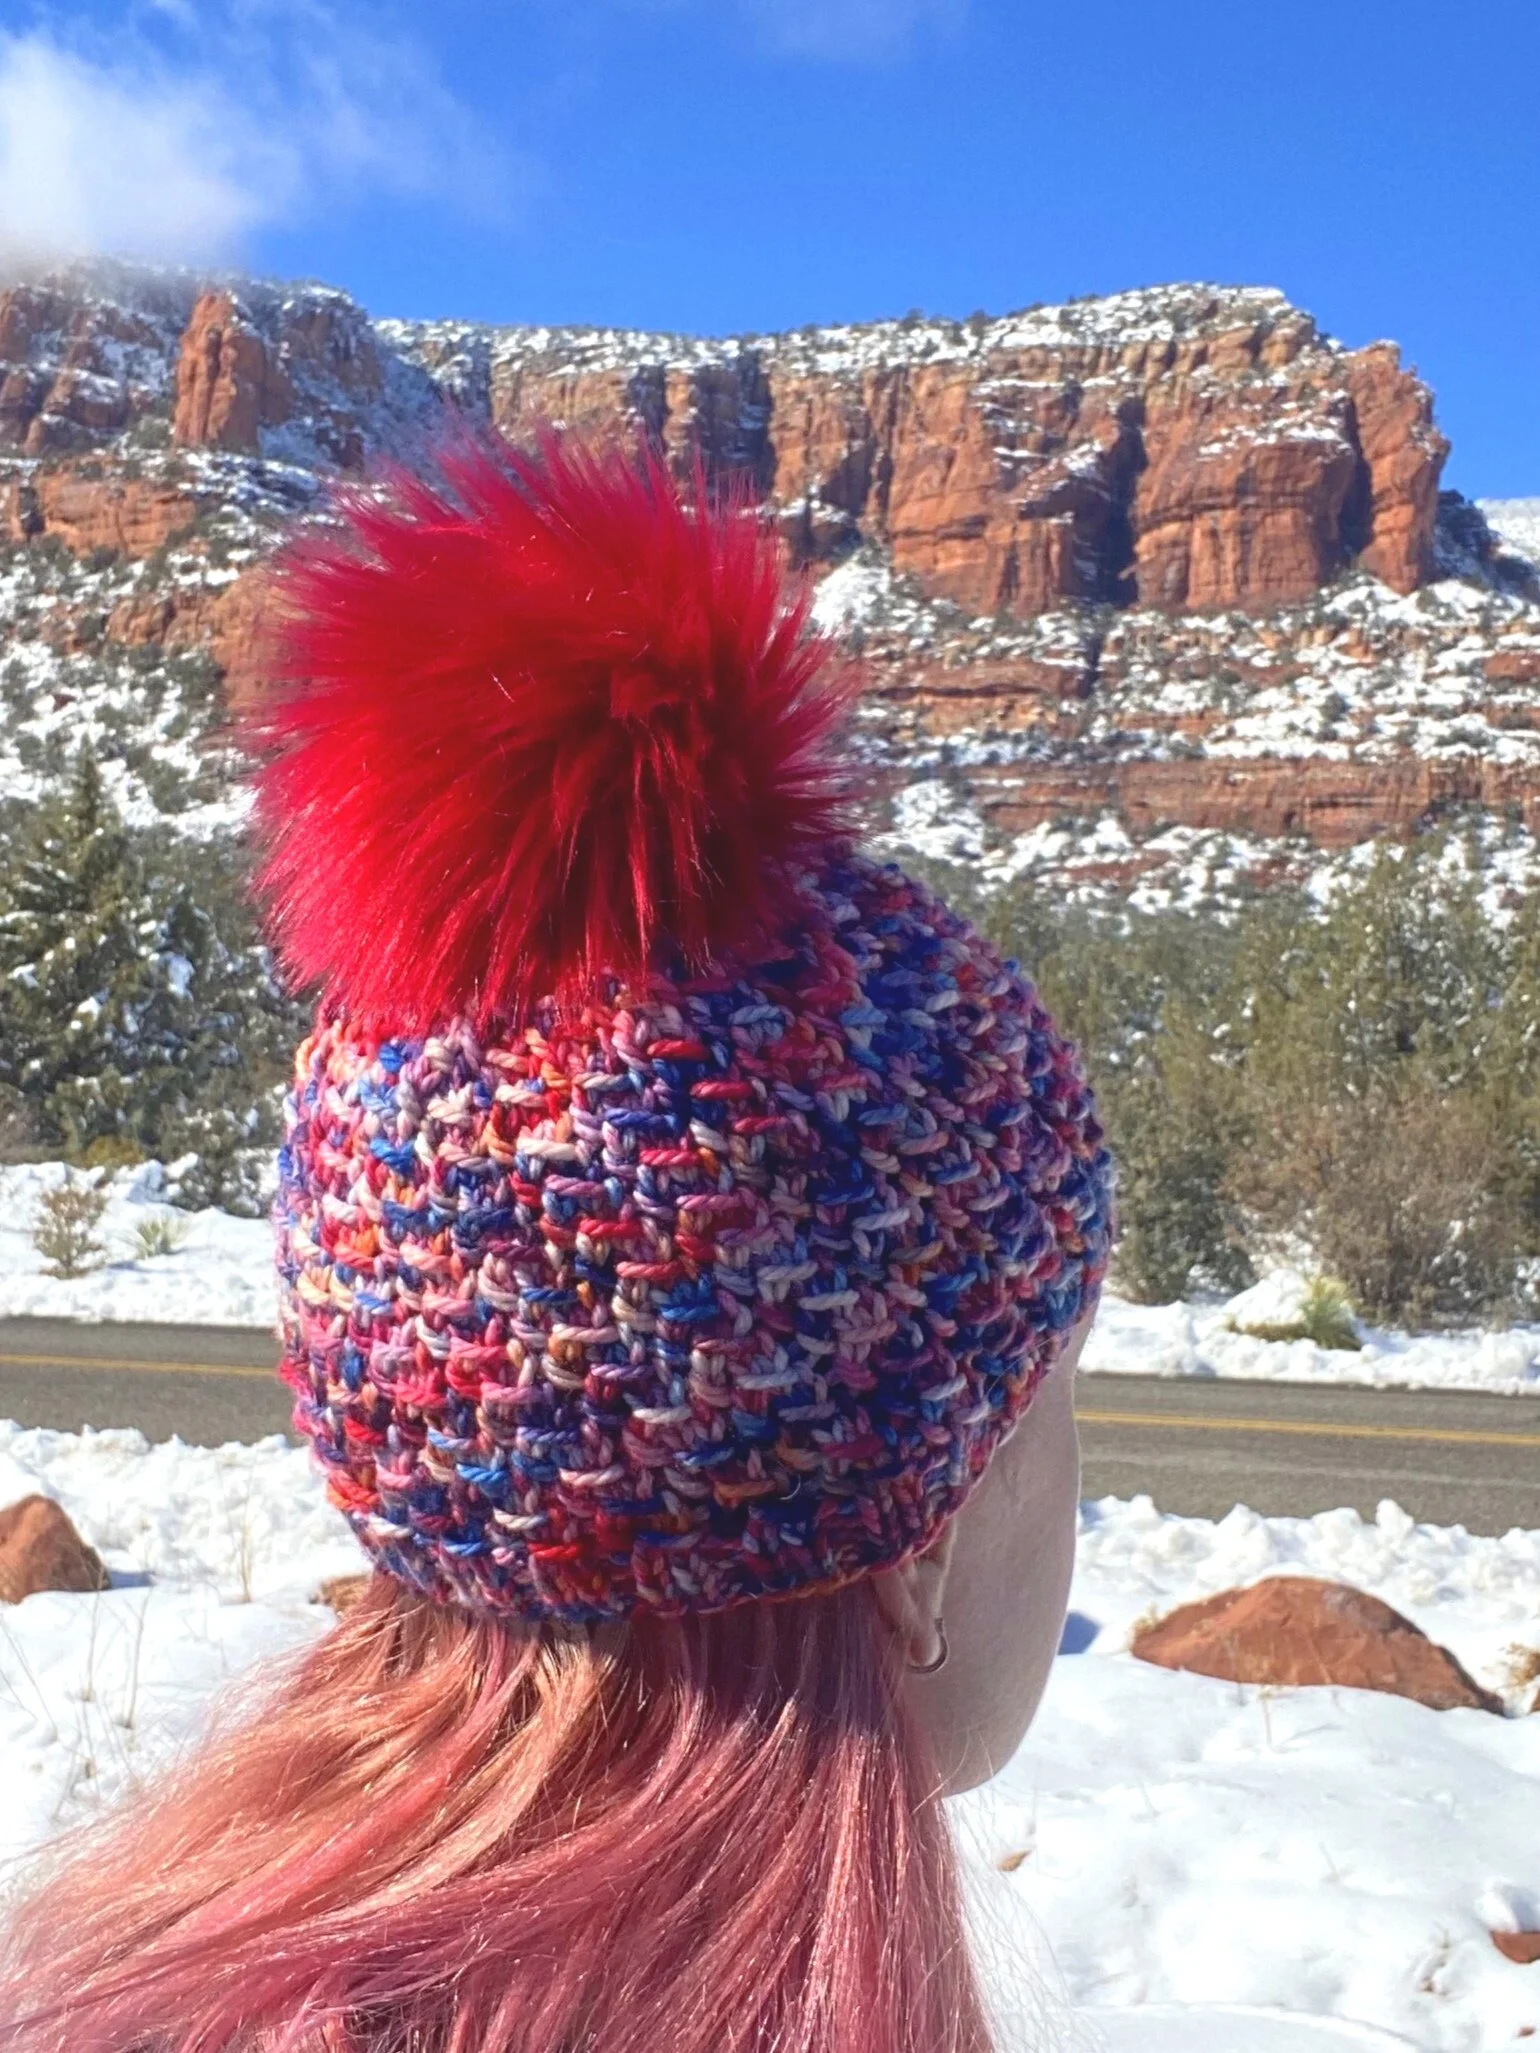
Make it in traditional colors like Colorway One.
The Pattern
Using long tail cast on, C1, and 16” circular needle, CO 72 sts. Join to work in the rnd. Place sm to note bor and be careful not to twist.
*K1, P1* for 10 rnds.
Next Rnd: *K9, M1L* around – 80 sts
You are done with C1. Cut yarn leaving a tail to weave in later and join C2. You will be working with C2 for the rest of the hat.
Next Rnd: Knit
Rnds 1 – 4: P23, K12, P10, K12, P23
Rnd 5: P23, C6R, C6L, P10, C6R, C6L, P23
Rnds 6 – 7: P23, K12, P10, K12, P23
Rnd 8: P21, P2tog, K12, m1PL, P10, m1PR, K12, P2tog, P21
Rnds 9 – 12: P22, K12, P12, K12, P22
Rnd 13: P22, C6R, C6L, P12, C6R, C6L, P22
Rnds 14 – 15: P22, K12, P12, K12, P22
Rnd 16: P20, P2tog, K12, m1PL, P12, m1PR, K12, P2tog, P20
Rnds 17 – 20: P21, K12, P14, K12, P21
Rnd 21: P21, C6R, C6L, P14, C6R, C6L, P21
Rnds 22 – 23: P21, K12, P14, K12, P21
Rnd 24: P19, P2tog, K12, m1PL, P14, m1PR, K12, P2tog, P19
Rnds 25 – 28: P20, K12, P16, K12, P20
Rnd 29: P20, C6R, C6L, P16, C6R, C6L, P20
Rnds 30 – 31: P20, K12, P16, K12, P20
Rnd 32: P18, P2tog, K12, m1PL, P16, m1PR, K12, P2tog, P18
Rnds 33 – 36: P19, K12, P18, K12, P19
Rnd 37: P19, C6R, C6L, P18, C6R, C6L, P19 Rnds 38 – 39: P19, K12, P18, K12, P19
Rnd 40: P4, begin working with your longer needle, P15, K12, P5. Onto shorter needle, P8. Continuing with longer needle, P5, K12, P15. Bring both needles on the shorter cable together so they are parallel to each other. You should have 8 sts on the front needle and 8 sts on the back needle. Knit a three needle bind off over 7 sts. You will have one st on your right needle with a gap separating it from the rest of the sts on your longer needle. Push sts up on your left needle (the longer needle) and work one more K BO st.
Your pigtails are now separated and the center of your hat is closed and bound off. You will now be working on the left pigtail first. You can put the sts for the right pigtail on your shorter needle or a piece of scrap yarn.

Colorway Two
Left Pigtail
Rnd 41: P14 (you have worked a total of 15 sts be- cause of that last bound off st already on your right needle), K12, P5, pick up and P3 sts across gap, place sm to note bor. You should have 35 sts on your longer needle.
Rnds 42 – 44: P15, K12, P8
Rnd 45: P15, C6R, C6L, P8
Rnds 46 – 47: P15, K12, P8
Rnd 48: P1, P2tog, P1, P2tog, P9, K12, P3, P2tog, P1, P2tog – 31 sts
Rnds 49 – 52: P13, K12, P6
Rnd 53: P13, C6R, C6L, P6
Rnds 54 – 55: P13, K12, P6
Rnd 56: P1, P2tog, P1, P2tog, P7, K12, P1, P2tog, P1, P2tog – 27 sts
Rnds 57 – 60: P11, K12, P4
Rnd 61: P11, C6R, C6L, P4
Rnds 62 – 63: P11, K12, P4
Rnd 64: P1, P2tog, P1, P2tog, P5, K12, *P2tog* twice – 23 sts
Rnds 65 – 68: P9, K12, P2
Rnd 69: P9, C6R, C6L, P2
Rnds 70 – 71: P9, K12, P2
Rnds 72: P1, P2tog, P1, P2tog, P3, K12, P2tog – 20 sts
Rnds 73 – 76: P7, K12, P1
Rnd 77: P7, C6R, C6L, P1
Rnds 78 – 79: P7, K12, P1
Rnd 80: P1, *P2tog* 3 times, *K2tog* 3 times, *SSK* 3 times, P1 – 11 sts
Cut yarn leaving a tail. Weave tail through remaining live sts several times and cinch tight.

Colorway Two. Left pigtail done, ready to work the right pigtail.
Right Pigtail
Transfer the sts that were on hold onto your long cable needle. Join yarn with front of piece facing you.
Rnd 41: P5, K12, P15, place sm to note bor pick up and P3 sts across gap. You should have 35 sts on your longer needle.
Rnd 42: P5, K12, P15
Rnds 43 – 44: P8, K12, P15
Rnd 45: P8, C6R, C6L, P15
Rnds 46 – 47: P8, K12, P15
Rnd 48: P2tog, P1, P2tog, P3, K12, P9, P2tog, P1, P2tog, P1 – 31 sts
Rnds 49 – 52: P6, K12, P13
Rnd 53: P6, C6R, C6L, P13
Rnds 54 – 55: P6, K12, P13
Rnd 56: *P2tog, P1* twice, K12, P7, P2tog, P1, P2tog, P1 – 27 sts
Rnds 57 – 60: P4, K12, P11
Rnd 61: P4, C6R, C6L, P11
Rnds 62 – 63: P4, K12, P11
Rnd 64: *P2tog* twice, K12, P5, *P2tog, P1* twice – 23 sts
Rnds 65 – 68: P2, K12, P9
Rnd 69: P2, C6R, C6L, P9
Rnds 70 – 71: P2, K12, P9
Rnd 72: P2tog, K12, P3, *P2tog, P1* twice – 20 sts Rnds 73 – 76: P1, K12, P7
Rnd 77: P1, C6R, C6L, P7
Rnds 78 – 79: P1, K12, P7
Rnd 80: P1, *K2tog* 3 times, *SSK* 3 times, P1, *P2tog* 3 times – 11 sts
Cut yarn leaving a tail. Weave tail through remaining live sts several times and cinch tight. Weave in your ends. If necessary, block lightly.
Add pom poms to each pigtail and go be merry!
Leave a comment below and let me know what colors you chose for your Wrapped in Red Hat! And remember: don’t forget to tag me @knitsyknits and #explorewithknitsy

Have fun with non traditional colors like these pinks in Colorway Two.
Want it without ads?
Purchase the Wrapped in Red Hat pattern ad free. A pdf will be automatically emailed to you once you complete your purchase.


More to explore


COPYRIGHT NOTICE
All patterns, text, and photos are owned by Krista Ann (aka KnitsyKnits, aka Explore with Knitsy). Any content from this website may not be copied for the purpose of redistribution for online or in print without written authorization from Krista Ann. If you would like to share a pattern or written content, please provide recipient with a link to the website. You may sell your finished products made using KnitsyKnits patterns, but please provide a direct link to the pattern in your listing. For any other use, please contact me directly. Thank you for supporting artists by using my content correctly so I can keep sharing free patterns with everyone!
PDF download of the Arctic Circle Hat pattern. This single pattern is ad free.
You’ll receive an email with a link to an immediately downloadable PDF so you can start knitting right away! Do you want step by step tutorials to make this hat? Click here and check out this cowl in The Knitting Rockstar Academy and upgrade your knitting skills!
[Please note that this is only the pattern for our Arctic Circle Hat, not a finished hat.]